How to Use Midjourney: Complete Beginner’s Guide | Free Tutorial
Midjourney has transformed how creators, designers, and hobbyists generate visual content. This AI image generator creates stunning artwork from simple text descriptions, making it accessible to anyone with an internet connection and a Discord account. Whether you need concept art, marketing visuals, or just want to explore your creativity, this guide walks you through everything from account setup to advanced techniques.
What Is Midjourney and How Does It Work?
Midjourney is an independent research lab that builds artificial intelligence tools for image generation. The system interprets natural language prompts and converts them into detailed visual artwork within minutes. Unlike traditional design software requiring technical skills, Midjourney responds to descriptive sentences—you simply tell it what you want to see.
The technology works through a process called diffusion modeling, where the AI starts with random noise and gradually refines the image toward your description. It learns from millions of existing images, understanding relationships between text descriptions and visual elements. When you type “a sunset over mountains at golden hour,” Midjourney recognizes concepts like color palettes, lighting conditions, and landscape features, then synthesizes them into a unique image.
The platform operates entirely through Discord, the popular messaging app. This means you don’t need to install special software—everything happens within Discord’s interface. The community aspect is significant: you can browse others’ creations, remix their prompts, and participate in ongoing conversations about techniques.
As of early 2024, Midjourney offers multiple model versions, with v6 being the latest and most capable. Each version brings improvements in detail rendering, prompt understanding, and overall image quality. Subscribers gain access to faster generation times, more features, and higher resolution outputs.
Setting Up Your Midjourney Account
Before generating images, you’ll need to set up two accounts: Discord and Midjourney. The process takes about fifteen minutes from start to finish.
First, visit discord.com and create a free account using your email. Choose a username you’ll remember—you’ll share this when posting in Midjourney servers. Download the desktop app for the best experience, though the web browser version works adequately for beginners.
Once your Discord account is ready, visit midjourney.com and click “Join the Beta” or navigate directly to the Midjourney Discord server. Accept the invitation and complete any verification steps Discord presents. You’ll find yourself in the Newbies channel, where new users practice generating images.
The Midjourney server organizes channels by topic. General channels show everyone’s generations, while themed channels focus on specific styles. Newcomers should start in the #newbies channels to practice without overwhelming the main feeds.
While Midjourney once offered free trials, the service now requires a paid subscription for most users. Plans start at $10 per month for basic access, with higher tiers offering faster generation speeds and additional features. Check the current pricing at midjourney.com/account to confirm rates before subscribing.
Understanding Midjourney Commands and Syntax
Midjourney relies on slash commands typed directly into Discord. These commands tell the AI what to generate and how to process your request. Mastering these commands unlocks the platform’s full potential.
The primary command is /imagine, which initiates image generation. The basic syntax follows this pattern:
/imagine prompt: a serene lake at sunrise with mountains in the background
After typing this command and pressing enter, Midjourney processes your request and returns four image variations within one to three minutes, depending on server load and your subscription tier.
Beyond the basic prompt, Midjourney supports numerous parameters that fine-tune your results. Parameters attach to the end of your prompt using double dashes:
- –ar controls aspect ratio. Use –ar 16:9 for landscape, –ar 9:16 for portrait, or –ar 1:1 for square images.
- –v selects the model version. Type –v 6 for the latest version, or –v 5.2 for previous generations.
- –s adjusts stylization. Higher values (–s 750) create more artistic, interpretive results; lower values (–s 50) stick closer to your literal description.
- –iw sets image prompt weight relative to text. Use –iw 0.5 to balance both, or –iw 1 for equal emphasis.
- –no removes unwanted elements. Adding –no plants eliminates vegetation from your image.
Other useful commands include /info to check your subscription status and remaining generation time, /fast to switch to faster (paid) mode, and /relax for unlimited relaxed mode on higher-tier plans.
Creating Your First Midjourney Image
Now comes the exciting part—generating your initial image. Follow these steps to create your first Midjourney artwork.
Navigate to any channel where you have generation permissions, typically found in the #newbies section or dedicated generation rooms. Type your first command using the /imagine syntax.
Try this prompt to start:
/imagine prompt: a cozy coffee shop interior with warm lighting, autumn leaves visible through the window, photorealistic style --ar 16:9 --v 6
Press enter and wait for Midjourney to process your request. The system displays a progress indicator, usually completing within two minutes during normal server conditions.
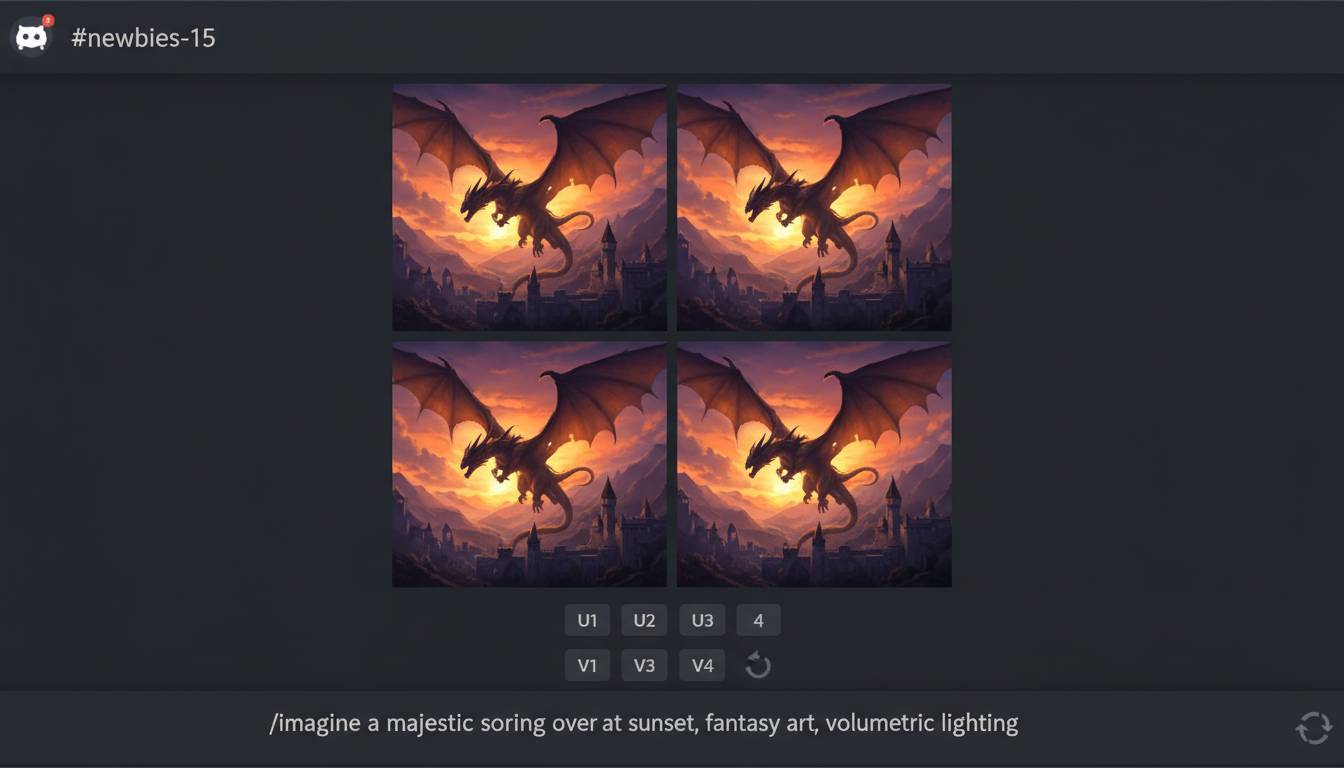
When finished, four images appear in your channel. Below each image, you’ll see buttons labeled U1, U2, U3, U4 and V1, V2, V3, V4:
- U buttons upscale the selected image, increasing resolution and adding detail.
- V buttons generate four new variations of that specific image, maintaining the composition while exploring different interpretations.
Click U1 to upscale the first image. Midjourney then provides a high-resolution version you can save. Right-click (or long-press on mobile) and select “Save Image” to download it to your device.
Congratulations—you’ve created your first AI-generated image. The real magic begins when you experiment with different prompts, parameters, and techniques.
Midjourney Parameters Explained
Parameters give you precise control over how Midjourney interprets your prompts. Understanding the most important parameters dramatically improves your results.
Aspect Ratio (–ar) determines image dimensions. Common ratios include 1:1 (square), 16:9 (widescreen), 9:16 (stories), and 4:3 (photograph proportions). Default is 1:1. Some ratios work better for specific content—portrait ratio suits character art, while landscape ratio excels at environments.
Version (–v) selects which model generates your image. The current default produces the most realistic results and best understands complex prompts. Older versions sometimes produce unique aesthetics worth exploring for stylistic purposes.
Stylize (–s) controls artistic interpretation. The scale runs from 0 to 1000, with 250 as the default. High stylization creates dreamy, artistic images that may diverge from your literal prompt. Low stylization prioritizes accuracy over artistic interpretation.
Chaos (–c) introduces variation in initial image generation. Higher chaos values (–c 100) produce dramatically different results across the four initial variations. Lower values keep variations more similar to each other.
Image Weight (–iw) matters when including reference images in your prompt. Higher values make your image reference more influential; lower values prioritize your text description. This parameter enables style transfer and composition control.
Negative Prompting (–no) tells Midjourney what to exclude. Adding –no people removes any human figures. You can chain multiple exclusions: –no people text watermark creates cleaner compositions.
Combine parameters for sophisticated results. This command demonstrates multiple parameters working together:
/imagine prompt: a futuristic city at night, neon lights, rain-slicked streets --ar 21:9 --v 6 --s 500 --c 50 --no cars
Tips for Writing Better Midjourney Prompts
Effective prompts produce better images. Follow these principles to maximize your results.
Be specific rather than vague. “A cat” produces generic results, while “a tabby cat with green eyes sitting on a velvet cushion, side profile, natural lighting” gives Midjourney clear visual goals. Include details about lighting (golden hour, studio lighting, volumetric rays), camera angle (wide angle, macro, eye level), and artistic style (oil painting, cyberpunk, documentary photography).
Use weighted terms to emphasize important elements. Place crucial concepts earlier in your prompt, as Midjourney gives more weight to words at the beginning. Use double colons to separate weighted sections: “mountain::2 lake::1 sunset::1.5” makes the mountain twice as important as the lake.
Reference artists or art styles intentionally. Adding “in the style of Studio Ghibli” or “watercolor painting by John James Audubon” guides the aesthetic. Be aware that this raises potential copyright considerations for commercial use.
Include technical photography terms for more realistic results. Words like “35mm film,” “f/1.8 aperture,” “depth of field,” and “cinematic lighting” trigger familiar photographic responses from Midjourney’s training data.
Describe emotions and atmosphere explicitly. “A lonely figure walking through a misty forest, melancholy mood, mysterious atmosphere” produces more evocative images than technical descriptions alone.
Use parentheses for optional emphasis. Placing words in parentheses slightly increases their importance without the heavier weight of double colons.
Common Mistakes to Avoid
New Midjourney users frequently encounter avoidable problems. Learning these pitfalls early saves time and frustration.
Many beginners write overly complex prompts with conflicting instructions. “A bright sunny day with dark stormy clouds and happy atmosphere but also scary” confuses the AI, resulting in muddy images. Choose a clear direction and commit to it.
Ignoring aspect ratio causes unexpected cropping. Generating a poster design in default square ratio may cut off important elements. Always specify –ar before generating if your project requires specific dimensions.
Forgetting to check older versions wastes potential. While v6 is the default and generally superior, version 5.2 sometimes handles certain styles better. Version 4 excels at consistent character faces. Test across versions for important projects.
Neglecting to use the remix feature limits learning. When Midjourney generates an image you like but want to adjust, click the remix button (usually requires enabling it in settings) to modify the prompt while keeping the successful elements.
Over-relying on parameters without understanding their interaction causes inconsistent results. Each parameter affects how others interpret. Practice with simple commands before combining multiple advanced parameters.
Assuming Midjourney owns the images you create can lead to confusion. While you generally retain rights to commercial use, review the current terms of service for specific policies, especially for monetized content.
Frequently Asked Questions
How much does Midjourney cost?
Midjourney offers subscription plans starting at $10 per month for basic access. The $30 per month plan provides faster generation speeds, and $60 per month unlocks additional features. Check midjourney.com for the most current pricing information, as costs occasionally change.
Can I use Midjourney images commercially?
Generally, yes. Paid subscribers typically receive commercial rights to images they create. However, you should review Midjourney’s current terms of service, as policies evolve. Some commercial uses involving trademarked characters or competing AI services may have restrictions.
Why does Midjourney sometimes generate weird or distorted images?
Distorted images often result from overly complex prompts, conflicting instructions, or requesting impossible anatomical configurations. Simplify your prompt, reduce the stylization parameter (–s), or specify the –v 6 parameter for improved realism. Using reference images with appropriate weights also helps.
How do I get consistent characters across multiple images?
Achieving consistent characters requires careful prompting and potentially using image references. Include specific descriptors in every prompt (age, hair color, distinctive features), keep stylization moderate, and use –v 6 for better consistency. Some users create reference images and consistently include them in prompts to anchor character appearance.
What’s the difference between fast and relaxed mode?
Fast mode prioritizes your generation queue, processing requests immediately when you submit them. Relaxed mode places your generations in a shared queue, potentially taking longer during busy periods but offering unlimited generations on higher-tier plans. Fast mode is ideal for time-sensitive work; relaxed mode suits experimentation.
How can I improve my prompt-writing skills?
Study prompts in the Midjourney community—browse public channels and note what descriptions produce results you admire. Keep prompts specific and detailed. Use theDescribe feature (/describe command) to analyze existing images and see how Midjourney interprets them. Practice consistently, noting which word choices improve your results.
Conclusion
Midjourney opens extraordinary creative possibilities for anyone willing to learn its interface and commands. Start with simple prompts, experiment with parameters, and study the community’s work to understand what produces compelling results. The platform rewards curiosity and iteration—your tenth prompt will likely far exceed your first.
Remember that Midjourney is a tool to augment your creativity, not replace it. Your vision, description skills, and artistic judgment determine whether the output matches your imagination. Subscribe to a plan that fits your usage, practice consistently, and don’t fear experimentation. The learning curve is gentle, and the results justify the effort invested.
Begin with one clear project in mind—perhaps a book cover, podcast artwork, or personal project visual. Generate several variations, learn from what works and what doesn’t, and gradually expand your capabilities. Within a week of regular practice, you’ll confidently create professional-quality images that once required extensive design experience or expensive software.