Yoga Poses for Back Pain Relief: 10 Easy Stretches
Back pain is one of the most common health complaints affecting millions of Americans. Whether you sit at a desk all day, have an active lifestyle, or are dealing with the effects of aging, incorporating gentle yoga stretches into your routine can significantly reduce discomfort and improve mobility. Yoga offers a holistic approach to back pain relief by combining stretching, strengthening, and breathing techniques that target the muscles supporting your spine.
In this guide, we’ll explore ten beginner-friendly yoga poses specifically designed to alleviate back pain. These poses are suitable for most people, including those who have never practiced yoga before. Remember to move slowly, never force your body into a position, and consult with a healthcare provider before starting any new exercise routine if you have existing health conditions.
Understanding Back Pain and How Yoga Helps
Before diving into the poses, it’s important to understand why back pain occurs and how yoga can help. Back pain often stems from muscle tension, poor posture, weak core muscles, or tight hips and hamstrings. When these areas become imbalanced, extra stress is placed on the spine.
Yoga addresses back pain through several mechanisms. First, stretching helps release tight muscles that may be pulling on your spine. Second, strengthening poses build the core muscles that provide support for your back. Third, breathing techniques promote relaxation and reduce stress, which can manifest as physical tension in your body. Finally, improved flexibility allows for better range of motion and less strain during daily activities.
The key to using yoga for back pain relief is consistency. Practicing these poses regularly, even for just 10-15 minutes daily, can yield better results than occasional longer sessions. Always listen to your body and modify poses as needed.
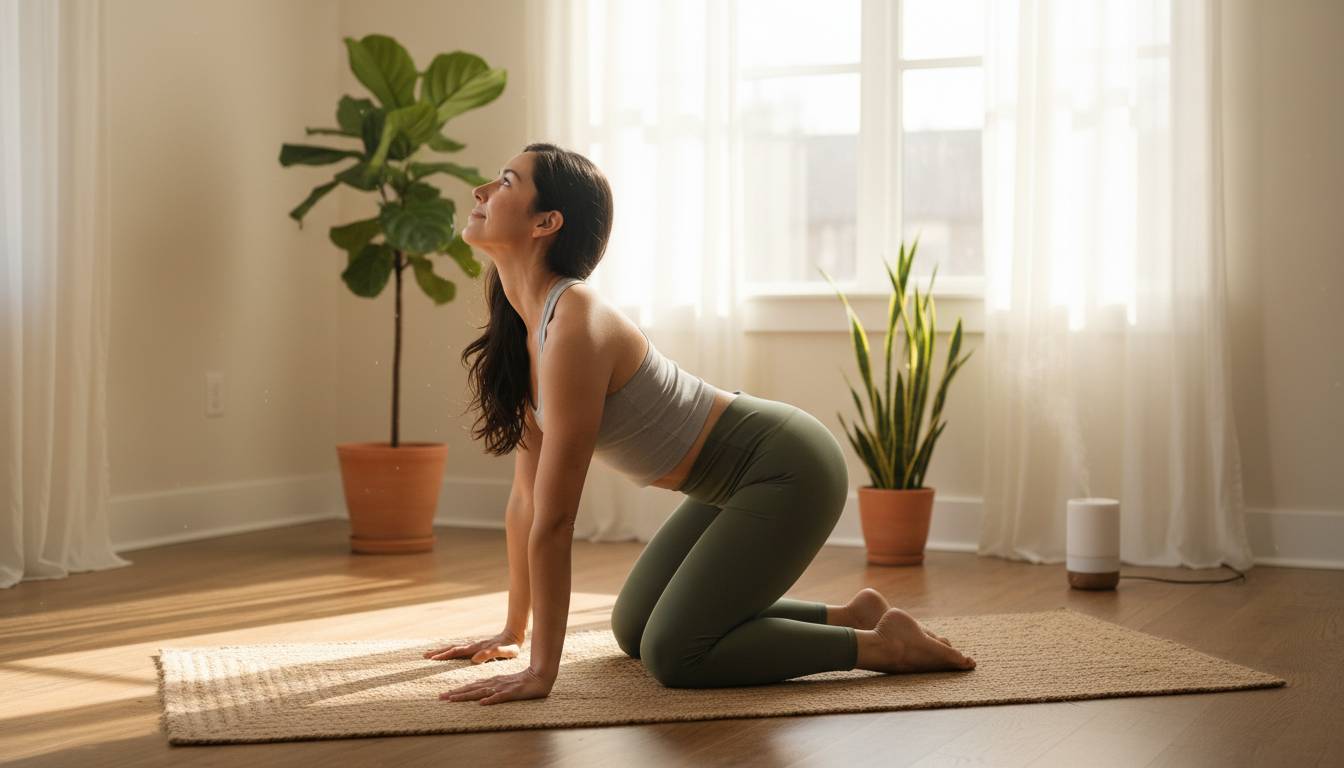
1. Cat-Cow Stretch (Marjaryasana-Bitilasana)
The cat-cow stretch is one of the most gentle and effective yoga poses for beginners dealing with back pain. This flowing movement warms up the spine and releases tension throughout the back.
How to perform:
Start on your hands and knees with your wrists directly under your shoulders and knees under your hips. For cat pose, exhale and round your spine toward the ceiling, tucking your chin to your chest and drawing your belly button toward your spine. For cow pose, inhale and arch your back, lifting your head and tailbone while dropping your belly toward the floor. Alternate between these two positions smoothly, coordinating each movement with your breath.
Benefits: This pose increases spinal flexibility, stretches the back muscles, and massages the organs in your abdomen. It also helps improve posture and balance.
Safety tips: Keep your movements slow and controlled. If you have wrist pain, you can make fists instead of pressing through your palms, or come down to your forearms.
2. Child’s Pose (Balasana)
Child’s pose is a resting position that gently stretches the lower back and hips while promoting relaxation. It’s an excellent pose to rest in between more active stretches.
How to perform:
Kneel on the floor with your big toes touching and your knees spread apart. Sit back on your heels and fold forward, extending your arms in front of you or alongside your body. Rest your forehead on the floor and breathe deeply into your back.
Benefits: This pose stretches the hip flexors, thighs, and ankles while calming the mind. It relieves tension in the back, shoulders, and neck. Many people find it helps reduce stress and fatigue.
Safety tips: If you have knee problems, place a pillow between your calves and thighs. You can also place a rolled blanket across your thighs to provide support.
3. Downward-Facing Dog (Adho Mukha Svanasana)
Downward-facing dog is a foundational yoga pose that stretches the entire back body while building strength in the arms and legs. It’s often used as a transitional pose but can be held for extended periods for its therapeutic benefits.
How to perform:
Start on your hands and knees, then tuck your toes and lift your hips up and back, forming an inverted V shape. Press your hands firmly into the floor, spreading your fingers wide. Keep your spine long and let your head hang naturally between your arms.
Benefits: This pose stretches the hamstrings, calves, and spine. It strengthens the arms and legs and helps relieve mild depression and fatigue. The inversion aspect can help reduce blood flow to the head, promoting a calming effect.
Safety tips: If you have tight hamstrings, keep your knees bent. You can also place your hands on blocks to reduce strain on your wrists. Avoid this pose if you have carpal tunnel syndrome or late-term pregnancy.
4. Sphinx Pose (Salamba Bhujangasana)
Sphinx pose is a gentle backbend that strengthens the spine and stretches the chest, shoulders, and abdomen. It’s accessible for most people and provides a safe way to begin backbending exercises.
How to perform:
Lie on your stomach with your legs extended behind you. Place your forearms on the floor with your elbows under your shoulders and your palms flat on the ground. Press through your forearms to lift your chest, keeping your lower ribs on the floor. Look straight ahead or slightly upward.
Benefits: This pose strengthens the spine, particularly the muscles along the vertebral column. It stretches the chest and shoulders, which can counteract the effects of hunching over a desk. It also helps improve posture and relieve stress.
Safety tips: Keep the movement gentle—there’s no need to lift high. If you feel any pinching in your lower back, come down slightly. Pregnant women should avoid deep backbends.
5. Cobra Pose (Bhujangasana)
Cobra pose is another gentle backbend that strengthens the spine and opens the chest. It’s often practiced as part of the sun salutation sequence but works well as a standalone pose for back pain relief.
How to perform:
Lie face down with your legs extended and the tops of your feet on the floor. Place your hands under your shoulders, hugging your elbows close to your body. Press through your hands to lift your chest, keeping your pelvis grounded. Only lift as high as comfortable—your lower ribs should remain on the floor.
Benefits: This pose strengthens the muscles along the spine and opens the chest and shoulders. It helps improve posture and can relieve stress and fatigue. The compression of the abdomen in this pose also stimulates digestive organs.
Safety tips: Never force the lift—let your back muscles do the work rather than pushing with your arms. If you have any back injuries, proceed with caution or skip this pose entirely.
6. Bridge Pose (Setu Bandha Sarvangasana)
Bridge pose is a gentle backbend that strengthens the back, glutes, and hamstrings while stretching the chest and spine. It’s an accessible pose that offers significant benefits for people with back pain.
How to perform:
Lie on your back with your knees bent and feet flat on the floor, hip-width apart. Place your arms alongside your body with your palms pressing into the floor. Press through your feet and lift your hips toward the ceiling, rolling your shoulders under and clasping your hands if comfortable.
Benefits: This pose strengthens the back body, which is crucial for spinal support. It stretches the chest, neck, and spine while calming the brain and reducing stress. It also helps improve digestion.
Safety tips: Keep your feet parallel—don’t let them turn out. If you have neck issues, place a blanket under your shoulders for support. Avoid this pose if you have serious neck problems.
7. Supine Twist (Supta Matsyendrasana)
The supine twist is a relaxing pose that stretches the spine, shoulders, and hips while helping to release tension in the back. It’s particularly beneficial for the lower back and can be done before bed to promote relaxation.
How to perform:
Lie on your back and draw your knees toward your chest. Let your knees fall to the right while extending your arms out to the sides in a T position. Turn your head to look toward your left hand. Hold for several breaths, then repeat on the other side.
Benefits: This pose stretches the spine, shoulders, and hips while massaging the internal organs. It helps relieve tension in the back and can aid in digestion. The rotation of the spine helps maintain its flexibility.
Safety tips: Don’t force your knees to the floor—let them rest where they’re comfortable. Place a pillow under your knees if there’s a gap between your legs and the floor.
8. Legs-Up-the-Wall Pose (Viparita Karani)
This restorative pose is excellent for relieving tired legs and lower back tension. It’s particularly helpful for people who spend a lot of time on their feet or sitting at desks.
How to perform:
Sit next to a wall and swing your legs up the wall as you lower your back to the floor. Scoot your hips as close to the wall as comfortable. Rest your arms at your sides with palms facing up. Close your eyes and breathe deeply.
Benefits: This pose relieves tired legs and mild backache. It helps calm the nervous system and can reduce swelling in the legs and feet. Many people find it helps with insomnia and headaches.
Safety tips: If you have glaucoma or serious neck problems, avoid this pose. You can place a pillow under your hips for more comfort if needed.
9. Corpse Pose (Savasana)
While corpse pose doesn’t involve any movement, it’s an essential part of any yoga practice for back pain relief. This pose allows your body to absorb the benefits of the stretches you’ve performed and promotes deep relaxation.
How to perform:
Lie flat on your back with your legs extended and arms at your sides, palms facing up. Close your eyes and let your feet fall open naturally. Focus on your breathing and let go of any tension in your muscles.
Benefits: This pose promotes complete relaxation and helps reduce stress and anxiety. It allows the body to rest and recover, which is essential for healing. The deep relaxation can help reduce muscle tension throughout the body, including the back.
Safety tips: Use props for comfort—you can place a pillow under your knees or a blanket under your head if needed.
10. Cat-Cow Seated Version
For those who find the traditional cat-cow on hands and knees challenging, the seated version offers similar benefits with less strain on the wrists and knees.
How to perform:
Sit in a chair with your feet flat on the floor. Place your hands on your knees. For the cat position, round your spine and tuck your chin to your chest. For the cow position, arch your back and lift your head and chest. Move smoothly between these positions with your breath.
Benefits: This version improves spinal flexibility and relieves tension in the back, neck, and shoulders. It’s perfect for office workers who need to relieve back pain during the workday.
Safety tips: Keep your feet grounded throughout the movement. If your chair doesn’t allow your feet to reach the floor, use a footrest.
Frequently Asked Questions
How often should I practice yoga for back pain relief?
Practicing yoga for back pain relief daily, even for just 10-15 minutes, is more effective than longer sessions done infrequently. Consistency is key when using yoga for therapeutic purposes. You can start with shorter sessions and gradually increase the duration as your body adapts.
Can yoga make back pain worse?
While yoga is generally safe for back pain, certain poses can exacerbate symptoms if performed incorrectly or pushed too far. Avoid deep backbends, forward folds that round the spine, and twisting poses that cause pain. Always work within your comfort zone and never force a position.
When should I avoid yoga for back pain?
You should consult a healthcare provider before starting yoga if you have a serious back condition such as a herniated disc, spinal stenosis, or osteoporosis. Also avoid yoga during acute episodes of back pain when inflammation is present. Wait until the acute phase subsides before resuming gentle stretching.
Do I need special equipment to practice these yoga poses?
You don’t need expensive equipment to practice yoga for back pain. A yoga mat provides cushioning and traction, but you can practice on a carpeted surface. Props like blankets, pillows, and blocks (or books) can help modify poses for greater comfort and accessibility.
Can beginners with no yoga experience do these poses safely?
Yes, all the poses listed in this guide are beginner-friendly and suitable for those with no prior yoga experience. Start slowly, focus on your breathing, and don’t compare yourself to others in the class. Consider working with a qualified yoga instructor who can provide personalized modifications.
How long does it take to see results from yoga for back pain?
Some people experience relief after just one session, while others may take several weeks of consistent practice to notice significant improvement. The benefits of yoga are cumulative—the more regularly you practice, the greater the improvements in flexibility, strength, and pain reduction you’ll experience.